A testcase is a single script or action performed by PTD to execute
a desired test or perform a desired function. This action is often
the execution of a Phantom script, but can also be any external application.
Testcases are the basic building blocks of entire test procedures
performed by PTD.
Testcases are organized by grouping them into Suites. All testcases
and suites are listed in the suite tree window with testcases marked
by a icon and suites marked by a icon. Using this structure, entire
sets of testcases can be run consecutively by running their parent
suite. See Suites for more information.

Creating a Testcase
To create a new testcase, begin by selecting the parent suite where
the testcase will reside. Right-clicking the suite will open a pop-up
menu. Select Insert and then Testcase from the pop-up menu. Alternatively,
selecting Suite then Insert and then Testcase from the main menu will
also work.
Once a new testcase is created, it will automatically be inserted
into the suite with the name ‘New Testcase’. The suite
properties panel will also be populated with information about the
new testcase.

Setting Testcase Properties
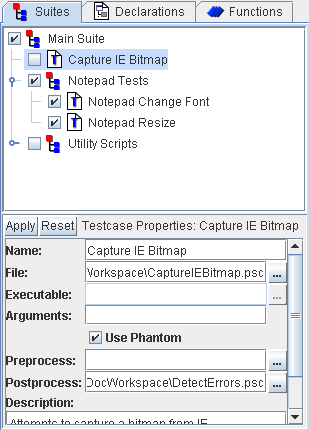
The testcase properties panel is used to define all information related
to the testcase. The ‘Name’ field indicates
what the testcase will be called and how it will be displayed in the
Suite view and in output.
The ‘File’ field is used to set the file
parameter. F If ‘Use Phantom’ is checked
(default) then this file is a Phantom script. If it is not checked,
this file will be passed to the executable set in the ‘Executable’
field. This field must contain the full path to the file.
The ‘Executable’ field is used to set
the full path to the executable file if the Phantom engine is not
used for the testcase. This field is only available if ‘Use
Phantom’ is not selected.
The ‘Arguments’ field can be used to
pass arguments to either a Phantom script or to the application defined
in the 'Executable' field. Arguments for Phantom
scripts are simply a single Phantom script line that will be executed
at the beginning of the testcase. Any variables created and functions
loaded will be available to the testcase script.
The ‘Use Phantom’ checkbox is set by
default to indicate that the ‘File’ field
contains a Phantom script. If Phantom is not to be used for this testcase,
this box can be cleared and a different executable set in the ‘Executable’
field.
The preprocess and postprocess scripts
can be entered in the ‘Preprocess’ and
‘Postprocess’ fields, respectively.
Applying Changes
The ‘Apply’ button will apply the changes immediately.
Alternatively, selecting another testcase or suite will automatically
apply any changes made. To avoid making changes, click the ‘Reset’
button to reset all fields to the original values. Changes do not
become permanent until the suite is saved.
A short text description of the testcase can be entered in the ‘Testcase
Description’ field. This is only for information purposes
and is not used during testcase execution.
Running a Testcase
A single testcase can be run directly from the suite viewer. Right-click
the testcase and select ‘Run’ from the popup menu. This
will run the single testcase, with the output displayed in the output
window. Alternatively, a single testcase can be run by selecting ‘Suite’
and then ‘Run’ from the main menu.
To run a group of testcases together, see Suites
for more information. Note that to debug a testcase, the underlying
script must be opened in the script editor and a debug
session initiated. Debugging only works
for testcases that run Phantom scripts.
Remote Running
See the section on Remote Execution
for information on how to run a script on a remote machine.

